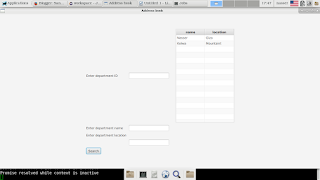
Populate data from
database into TableView JavaFX
Step1:
Connect to the
databse
Step2:
Design the form :-
put TableView and
the button
Step3:
populate data
Step1:
Connect to Databse:-
Connector Class:
-First of all we
need a connector class that initialize our connection to the
database, in this case it will be a MySql DB
Make a normal class
and name it JDBCMySQLConnection (It’s just a convention)
package
application;
import
java.sql.*;
public
class
JDBCMySQLConnection {
private
static
JDBCMySQLConnection instance
= new
JDBCMySQLConnection();
//URL
to the databse
/*where
jdbc
is essential
* mysql
is the dbms
* localhost:
the host of the server
* jdbcdb:
the name of the databse
*/
public
static
final
String URL="jdbc:mysql://localhost/jdbcdb";
//User
name to the database
public
static
final
String USER_NAME="";
//Password
public
static
final
String PASSWORD="";
//Driver
: it comes with the jar file
public
static
final
String DRIVER_CLASS="com.mysql.jdbc.Driver";
private
JDBCMySQLConnection(){
try{
Class.forName(DRIVER_CLASS);
}catch(ClassNotFoundException
e){
e.printStackTrace();
}
}
private
Connection createConnection(){
Connection
connection
= null;
try{
connection
= DriverManager.getConnection(URL,
USER_NAME,
PASSWORD);
}catch(SQLException
e){
System.out.println("Error
Unable to connect to DB");
}
return
connection;
}
public
static
Connection getConnection(){
return
instance.createConnection();
}
}
Step2 Design the
form:
Here is the FXML
file
<?xml
version="1.0"
encoding="UTF-8"?>
<?import
java.net.*?>
<?import
javafx.geometry.*?>
<?import
javafx.scene.control.*?>
<?import
javafx.scene.layout.*?>
<?import
javafx.scene.text.*?>
<?import
javafx.collections.*?>
<?import
javafx.control.cell.*?>
<?import
javafx.scene.control.cell.PropertyValueFactory?>
<?import
application.*?>
<GridPane
alignment="CENTER"
hgap="10"
vgap="10"
xmlns:fx="http://javafx.com/fxml"
fx:controller="application.Test_Controller">
<padding>
<Insets
bottom="10.0"
left="10.0"
right="10.0"
top="10.0"/>
</padding>
<Button
text="Search"
onAction="#searchById"
GridPane.columnIndex="0"
GridPane.rowIndex="4"/>
<TableView
fx:id="tableView"
GridPane.columnIndex="4"
GridPane.rowIndex="0">
<columns>
<TableColumn
fx:id="dep_name_column"
text="name"/>
<TableColumn
fx:id="dep_location_column"
text="location"/>
</columns>
</TableView>
</GridPane>
And the last step is to make a query and put its results in the table
Here is the controller code with comments which describe it
package application;
import java.sql.Connection;
import java.sql.ResultSet;
import java.sql.SQLException;
import java.sql.Statement;
import javafx.beans.property.ReadOnlyStringWrapper;
import javafx.beans.property.SimpleStringProperty;
import javafx.collections.FXCollections;
import javafx.collections.ObservableList;
import javafx.event.ActionEvent;
import javafx.fxml.FXML;
import javafx.scene.control.TableColumn;
import javafx.scene.control.TableView;
import javafx.scene.control.TextField;
public class Test_Controller {
//FXML id's
@FXML protected TextField dep_id_field;
@FXML protected TextField dep_name_field;
@FXML protected TextField dep_location_field;
@FXML protected TableView<Department> tableView = new TableView<Department>();
@FXML TableColumn<Department, String> dep_name_column ;
@FXML TableColumn<Department, String> dep_location_column;
Department department;
//API's variables
//Objects that we will use to connect to the DB
//Connection object which establish the connection
Connection connection = null;
//Object which holds the query
Statement statement = null;
//Object which holds the query results
ResultSet rs = null;
@FXML public void initialize()
{
//This is essential if u use JavaFX 8 to prevent blank columns
tableView.setColumnResizePolicy(TableView.CONSTRAINED_RESIZE_POLICY);
}
//Search Button
@FXML protected void searchById(ActionEvent event)
{
//ObservableList to automatically update the table
final ObservableList<Department> results = FXCollections.observableArrayList();
//Assign columns to data
dep_name_column.setCellValueFactory(cellData -> new ReadOnlyStringWrapper(cellData.getValue().getDepName()));
dep_location_column.setCellValueFactory(cellData -> new ReadOnlyStringWrapper(cellData.getValue().getDepLocation()));
//Start databse stuff
String query = "SELECT * FROM department";
try{
connection = JDBCMySQLConnection.getConnection();
statement = connection.createStatement();
rs = statement.executeQuery(query);
while(rs.next()){
//Assign results to the list
department = new Department(rs.getString("dep_name"), rs.getString("location"));
results.add(department);
}
//Put the list into the table
tableView.setItems(results);
}catch(SQLException e){
e.printStackTrace();
}finally {
if(connection != null) {
try{
connection.close();
}catch(SQLException e){
e.printStackTrace();
}
}
}
}
//End Search Button
//This is a JOJO class which use to manipulate data, it's used to define data u //want to populate
public static class Department{
public SimpleStringProperty depName;
public SimpleStringProperty depLocation;
public Department(String dep_Name, String dep_Location){
this.depName = new SimpleStringProperty(dep_Name);
this.depLocation = new SimpleStringProperty(dep_Location);
}
public String getDepName()
{
return depName.get();
}
public void setDepName(String dep_Name)
{
depName.set(dep_Name);;
}
public String getDepLocation()
{
return depLocation.get();
}
public void setLocation(String dep_Location)
{
depLocation.set(dep_Location);
}
}
}
Link to the full code
FXML file:
https://pastebin.com/ptVcSBAZ
Connector class:
https://pastebin.com/m641Wfvu
Controller class:
https://pastebin.com/NXnMN0Na


